

Introduction: DIY Built-In-Flash Ring Flash Adapter


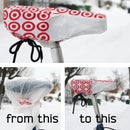
This instructable will teach you how to make a cheap and easy ring flash adapter for any built-in-flash on DSLR cameras. A ring flash casts a much more even and soft light on your subjects as opposed to the harsh spotlight that the unfiltered built-in-flash provides. Check out the side by side comparison of a test of this exact ring flash adapter. This project only requires about $2 in materials and an hour or two of your time and produces great results.
Step 1: Tools and Materials


Tools:
-X-Acto knife
-Ruler
Materials:
-Aluminum tape (you can substitue aluminum foil and adhesive spray and a bit more mess)
-Cheap plastic bowl
-Masking tape
-Black spray paint
-Cardboard (any cereal box will work)
Step 2: Preparing the Bowl


We have to make a few simple modifications to the bowl. This will depend on the size of your bowl and camera, but I measured the size of the lens and cut a hole in the center of the bowl that the lens could fit through. I also cut off the wide lip of the bowl because it was unnecessary.
Step 3: Lens Sleeve


Next up is the sleeve that the lens will fit into. You want it to be snug enough that the adapter won't be slipping on the lens but loose enough that it's easy to get on and off.
-Cut 2 strips of cardboard. The width of the first strip should be the height of your bowl, and the second should be about 1/2" wider than that. The strips should be long enough to easily wrap around the lens.
-Take the first strip (the narrower one) and cut it to length so that it fits snugly around the lens, and tape it here.
-Now take the wider strip and cut tabs into it along one edge (see photo), then wrap it around the first sleeve and tape it. You should end with one sleeve fitting snugly inside the other, with the smaller sleeve fitting on the lens.
-Wrap the outside of the sleeve with aluminum tape.
Step 4: Reflect the Bowl!


Cover the inside of the bowl in reflective material. The more, the better.
Step 5: Attach the Sleeve to the Bowl


Fit the lens sleeve inside the bowl and tape the tabs down.
Step 6: Flash Window


Now we have to make a window for the built-in-flash to enter the adapter. Cut out a window in the side of the bowl a bit larger than the size of the flash on the camera. Use the extra cardboard to fashion a channel for the light. You should have a 45 degree angle to reflect the light coming straight out down into the ring flash. Then cover the inside with more reflective tape and attach it to the bowl.
Step 7: Diffuser


Trace the adapter onto a piece of paper and fit it into the flash. I adhered my diffuser to a piece of plastic to make it more rigid, but this is optional. Take your finished ring flash into a dark bathroom and take a picture in the mirror. Set the exposure to the flash so the background is dark. This will show you any hot spots (extra bright patches), and you can layer paper until the flash gives off an even ring of light.
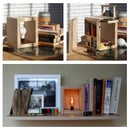
Step 8: Paint It Black

I decided to paint the outside of my adapter black. I chose a flat black to match the finish on the camera and help hide tape.
Step 9: Done!

Go test your new ring flash - it works particularly well for macro and portrait photography. Thanks for reading!

Participated in the
The Photography Contest

Participated in the
Make It Glow


