DIY: himmeli geometric wreath tutorial

DIY Himmeli Geometric Wreath | offthebeatenpress.com
Back in January, I made two himmeli wreaths that turned out amazing. I wanted to make a third to hand in my house with the other and I also finally finished the first one I had started making in the fall when Hobby Lobby restocked their aluminum tubing. I took pictures to show you all how you can make your own. It is super easy. Of the two (aluminum vs paper straws), the paper straw wreath is much easier, as it doesn't take as long to cut all the pieces.SUPPLIES:
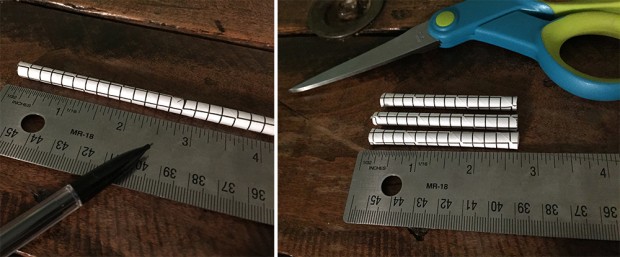
35 Paper Straws
Thin Floral Wire - I use this from Amazon.
Scissors
Ruler
Pencil/Pen

DIY Himmeli Geometric Wreath | offthebeatenpress.com
DIY Himmeli Geometric Wreath | offthebeatenpress.com

DIY Himmeli Geometric Wreath | offthebeatenpress.com

DIY Himmeli Geometric Wreath | offthebeatenpress.com

DIY Himmeli Geometric Wreath | offthebeatenpress.com

DIY Himmeli Geometric Wreath | offthebeatenpress.com

DIY Himmeli Geometric Wreath | offthebeatenpress.com

DIY Himmeli Geometric Wreath | offthebeatenpress.com

DIY Himmeli Geometric Wreath | offthebeatenpress.com

DIY Himmeli Geometric Wreath | offthebeatenpress.com
DIY Himmeli Geometric Wreath | offthebeatenpress.com

DIY Himmeli Geometric Wreath | offthebeatenpress.com

DIY Himmeli Geometric Wreath | offthebeatenpress.com

DIY Himmeli Geometric Wreath | offthebeatenpress.com
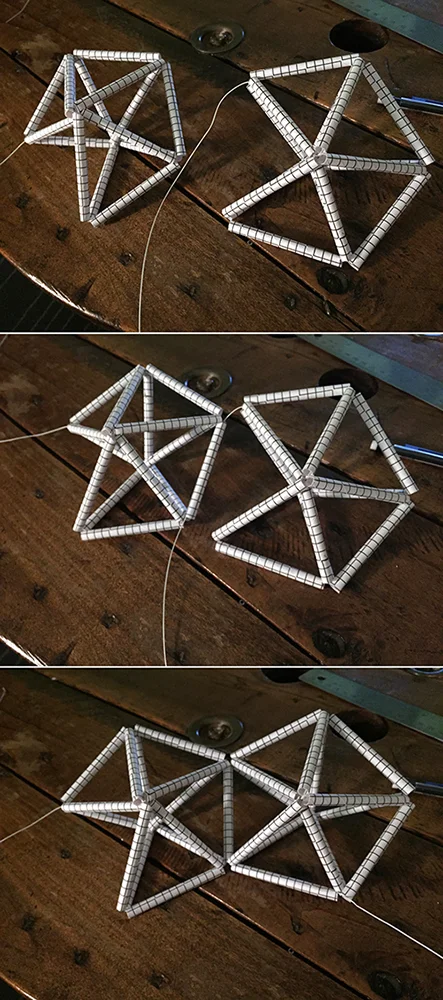
DIRECTIONS:1. Cut the paper straws into thirds. Straws are 7.75 inches, so you need to cut them into just over 2.5 inch pieces. You can pull out a ruler and measure your first few pieces and then use those as a guide to cut the rest.Sometimes the straws come in a flat package. If that is the case you can measure the group and mark the outside of the pack and cut them in one fell swoop. This makes it incredibly easy to do so if you can buy straws already in flat packaging - I highly suggest it! Once you are done, you should have 105 little pieces!2. Cut a long piece of wire. Start with a bigger piece than you think you need: around 4-5 feet! I used my arm length and cut a little over twice my right arm. You want to leave some extra and can trim down later!3. String on four straws into a diamond pattern. Twist the wire together to hold in place.4. Add two more pieces to the wire. Then fold them back over the opposite end you strung it and twist. It should create this kind of shape.5. Repeat until you have five folds. Add two more at a time, bend and fold it to the opposite end. You twist the wire on each side to keep it tight. The final shape will look like the one below.6. String the wire back through from the center to a wing of the star. The wire will be sticking out were five of the points meet. Pick any straw and pull it back through until it is sticking out of an end where only two straws meet.7. Add one straw to where the wire is extended. In this picture you can see the five-points and how the wire has been pulled back through. This is where you place a new straw piece. Once connected, you bend it towards another two-point section and wrap the wire around the connecting area.8. Repeat three more times until you connect four sides together. You want to leave one side open which we will use later to connect the final wreath. Wire should be still hanging out of one of the two-point sections.9. Repeat steps 2-8 until you have 7 little shapes! Each one should have four connected sides and one open end where a loose wire is extended.10. Connect the shapes. You want to place the open end of one shape to an closed end of a shape next to it. You feed the wire from shape number one through a straw on shape number two. Then you twist it at the bottom. This leaves one shape completed and the wreath begins to grow.11. Repeat this until all the shapes are connected together. You may have some wire sticking out of various places. Simple weave it back through the straws, twisting at different points. This will make the wreath sturdier. When you get to an end of a wire, just tuck it hidden into a straw!Your final himmeli wreath is done! They are really lightweight so they can be hung easily with command hooks or a small tack nail. Here are all the wreaths in my house together.And the aluminum one I have hanging in the summer outside my door.