Standing Forward Bend
Uttanasana will wake up your hamstrings and soothe your mind.
Heading out the door? Read this article on the new Outside+ app available now on iOS devices for members! Download the app.
Uttanasana (Standing Forward Bend) may be one of the very first postures a new yogi learns. It’s also one of the most misinterpreted or misunderstood.
“Contrary to popular belief, Standing Forward Bend is not about touching your toes. Nor is it about squeezing out all the length you can muster from your fingertips,” says Cyndi Lee, founder of OM Yoga Center in New York City. Many beginners are surprised (and a bit skeptical) to learn that Uttanasana is not actually about the relationship between fingers and toes. It is about almost everything in between.
Let us explain: The Sanskrit word uttanasana is made up of “ut,” which means “intense,” “powerful,” or “deliberate,” and the verb “tan,” meaning to “stretch” or “lengthen.” Uttanasana is a purposeful extension of the entire back body—including the territory from the soles of the feet and up the backs of the legs.
“This [stretch] spans the lower, middle, and upper back; rises up the neck; and circles over the scalp and back down the forehead, finally ending at the point between the eyebrows,” says Lee. When you fold forward in Uttanasana, you stretch this entire sheath of muscles and connective tissue, from the fulcrum of the forward bend, the pelvis.
That movement is a big job. In order to facilitate a deep and satisfying stretch (not one that overextends your hamstrings, or is hyper-focused on toe-touching), it’s valuable to enter this pose with care and intention.
Section dividerSanskrit
Uttanasana (OOT-tan-AHS-ah-nah)
ut = intense
tan = to stretch or extend
Pose basics
Pose type: Forward bend
Targets: Full body
Benefits: Standing Forward Bend can improve your body awareness and balance. As a calming and relaxing pose, it can help you manage stress as it activates the relaxation response (your parasympathetic nervous system) and deactivates the stress response (your sympathetic nervous system). This pose also stretches the back side of your body, including your back and shoulders, buttocks (glutes), back of your thighs (hamstrings), calf muscles, and the soles of your feet.
Other Standing Forward Bend perks:
- May help regulate blood pressure
- Assists in relieving anxious thoughts and feelings
How to
- Begin in Tadasana (Mountain Pose) at the front of the mat with your hands at your hips.
- Bend your knees slightly and fold your torso over your legs, hingeing from the hips, not the lower back.
- Your hands may land next to your feet or on the ground in front of you.
- Inhale and extend your chest to lengthen your spine.
- Exhale and gently press both legs toward straight without hyperextending. Lift the kneecaps and gently spiral your upper, inner thighs back.
- On an exhalation, extend your torso down without rounding your back. Lengthen your neck, extending the crown of your head toward the ground, while you draw your shoulders down your back toward your hips.
Beginner tips
- If you have tight hamstrings, try placing your palms or fingertips onto one or two blocks stacked tall and placed several inches in front of your feet, below your shoulders.
- If you have tight hamstrings, soften your knees as much as you need to in order to fold forward. Imagine that the sacrum is sinking deeper into your pelvis and bring the tailbone closer to the pubis. Then, against this resistance, push the top thighs back and the heels down and straighten the knees again. Practice in the pose to increase the length of the back legs gradually.
- Be careful not to lock your knees. Check by pressing your hands against the back of each knee to make sure there is some give in the joint.
- Stand firm. Ground your feet down into the mat by pressing into all sides of the bottom of each foot. Creating a solid yet easeful stance will allow the stability for the top of your body to freely hang forward, letting gravity do the work.
Deepen the pose
- To increase the stretch in the backs of your legs, lean slightly forward and lift up onto the balls of your feet, pulling your heels a half-inch or so away from the floor. Draw your inner groin deep into the pelvis, and then, from the height of the groin, lengthen your heels back onto the floor.
- Use the wall to help focus on the details of the stretch. Stand with your heels 2–3 inches away from the wall and lean your sacrum against it. Soften your knees, and fold forward over your thighs. Let your head and arms hang heavy and gently tilt your sit bones up the wall until you feel a gentle stretch in your hamstrings. Take 3–4 slow and steady breaths here, then bend your knees enough to plant your palms on the floor or blocks. Return to standing.
Common misalignments
- Yoga teacher Tiffany Russo reminds students to bend from the hips—not the spine. The motion is more hingeing forward than curling over. Think of your legs as pillars that don’t move. Lengthen in the spine, getting tall, then fold out and up over your thighs to reach the crown of the head toward the ground.
- It can be easy in this pose to unintentionally hold tension in your neck. Instead, consciously let the head go heavy as you gaze toward your legs.
Be mindful!
- If you suffer from low back pain, make sure to enter the posture with bent knees. Rather than straightening the legs, keep the bend and place your hands several inches in front of your feet, or hold onto your forearms and allow your head to hang heavy.
- Avoid rounding your spine forward into spinal flexion in this pose, especially if you have osteoporosis, bulging discs, herniation, or other back pain or issues. With these or other conditions or pain in the back, consult with your doctor for advice on what is safe to practice. Try the gentler modifications with a flat back and elongated spine.
- Use extreme caution or avoid bringing your head below your heart if you have high or low blood pressure, a heart condition, vertigo, or extreme dizziness, heartburn, or an ear infection. If you have certain eye conditions (glaucoma, detached retina, diabetic retinopathy, recent cataract surgery, for example), ask your ophthalmologist if it is safe to practice forward bends. Try to keep your head above your heart by using blocks.
- Avoid Uttanasana if you have a hamstring tear. Consult with your doctor to determine when you may begin to add this pose gently back into your practice.
- If you are pregnant, try with your legs wide to allow room for your belly. Enter this pose carefully, paying careful attention to how your center of gravity changes as your belly grows.
Teacher tips
These tips will help protect your students from injury and help them have the best experience of the pose:
- Remind your students that this pose is not about eventually touching their toes or the mat. You may need to say this every time you teach, as it is one of the most common yogic misconceptions. Mastery of Uttanasana is in no way about “reaching” that goal of touching the mat or touching the toes, or about stretching the fingers ever longer.
- Invite your students to grab each elbow with the opposite hand. In a standing forward bend, this can help this pose feel more natural, and also allow students to go deeper as gravity pulls their weight down toward the mat. (This move also prevents students from obsessing about whether their fingers are nearing their toes.)
- Invite a focus on aligning the ankles, knees, and hips. Getting centered here can help prevent students from leaning forward or backward, or shifting to their heels.
- If you have students suffering from back injuries, advise them to do this pose with bent knees or perform Ardha Uttanasana (Standing Half Forward Bend) with their hands on the wall, legs perpendicular to their torso and arms parallel to the floor.
- For students looking to further extend the muscles on the backs of their legs, advise them to stand in the forward bend with the balls of their feet elevated an inch or more off of the floor on a sand bag or thick book.
Standing Forward Bend variations
Try Padangusthasana (Big Toe Pose): After bending forward, slide the index and middle finger of each hand in between the big toe and second toe of each foot. Then curl your fingers and thumb around your big toe. As you inhale, straighten your arms and lift your front torso away from your thighs, making your back as concave as possible. Hold for a few breaths, then exhale and lengthen down and forward, bending your elbows out to the sides.
Or, try one of these creative variations:
Half Standing Forward Bend with blocks
Blocks can help bring the floor closer to you. You may also want to slightly bend your knees if your hamstrings are tight.
Bent-Knee Standing Forward Bend
Follow the step-by-step instructions above, but bend your knees as much as you need to. Your torso may rest on your thighs. Work to extend the legs gradually.
Standing Forward Bend on a chair
For a more relaxed version of the pose, rest your forearms on the seat of a chair.
Section dividerWhy we love this pose
“Uttanasana (Standing Forward Bend) continues to teach me a lot about the process of practice,” says Iyengar teacher Chrissy Carter. “I love the process of building the architecture of this pose because I can absolutely feel the difference in my physical and energetic body when I tap into a more integrated approach.”
This pose prompts her to examine her stance carefully: “Where is the weight in my feet? Am I attempting to straighten my knees by pushing them back, or can I extend my knees by pressing my calves forward into my shins and then lifting the tops of my thighs up? Am I balancing the effort of tipping my pelvis over the tops of my thighs with the oppositional effort of drawing my outer upper thighs down towards my outer knees? When I find the relationship between all of these actions, I find the pose—and then it’s no longer about the pose itself, but rather how I’m connecting to the experience of being in the pose.”
Section dividerPreparatory and counter poses
Standing Forward Bend can be a warmup or a restorative pose to neutralize your hips and stretch your back and hamstrings throughout your practice.
Preparatory poses
Ardha Uttanasana (Standing Half Forward Bend)
Paschimottanasana (Seated Forward Bend)
Supta Padangusthasana (Reclining Hand-to-Big Toe Pose)
Counter poses
Adho Mukha Svanasana (Downward-Facing Dog)
Section dividerAnatomy
You can rely on Uttanasana as a warmup or a resting pose during your yoga practice. Either way, it neutralizes your hips and stretches your back and hamstrings.
In the drawings below, pink muscles are stretching and blue muscles are contracting. The shade of the color represents the force of the stretch and the force of contraction. Darker = stronger.
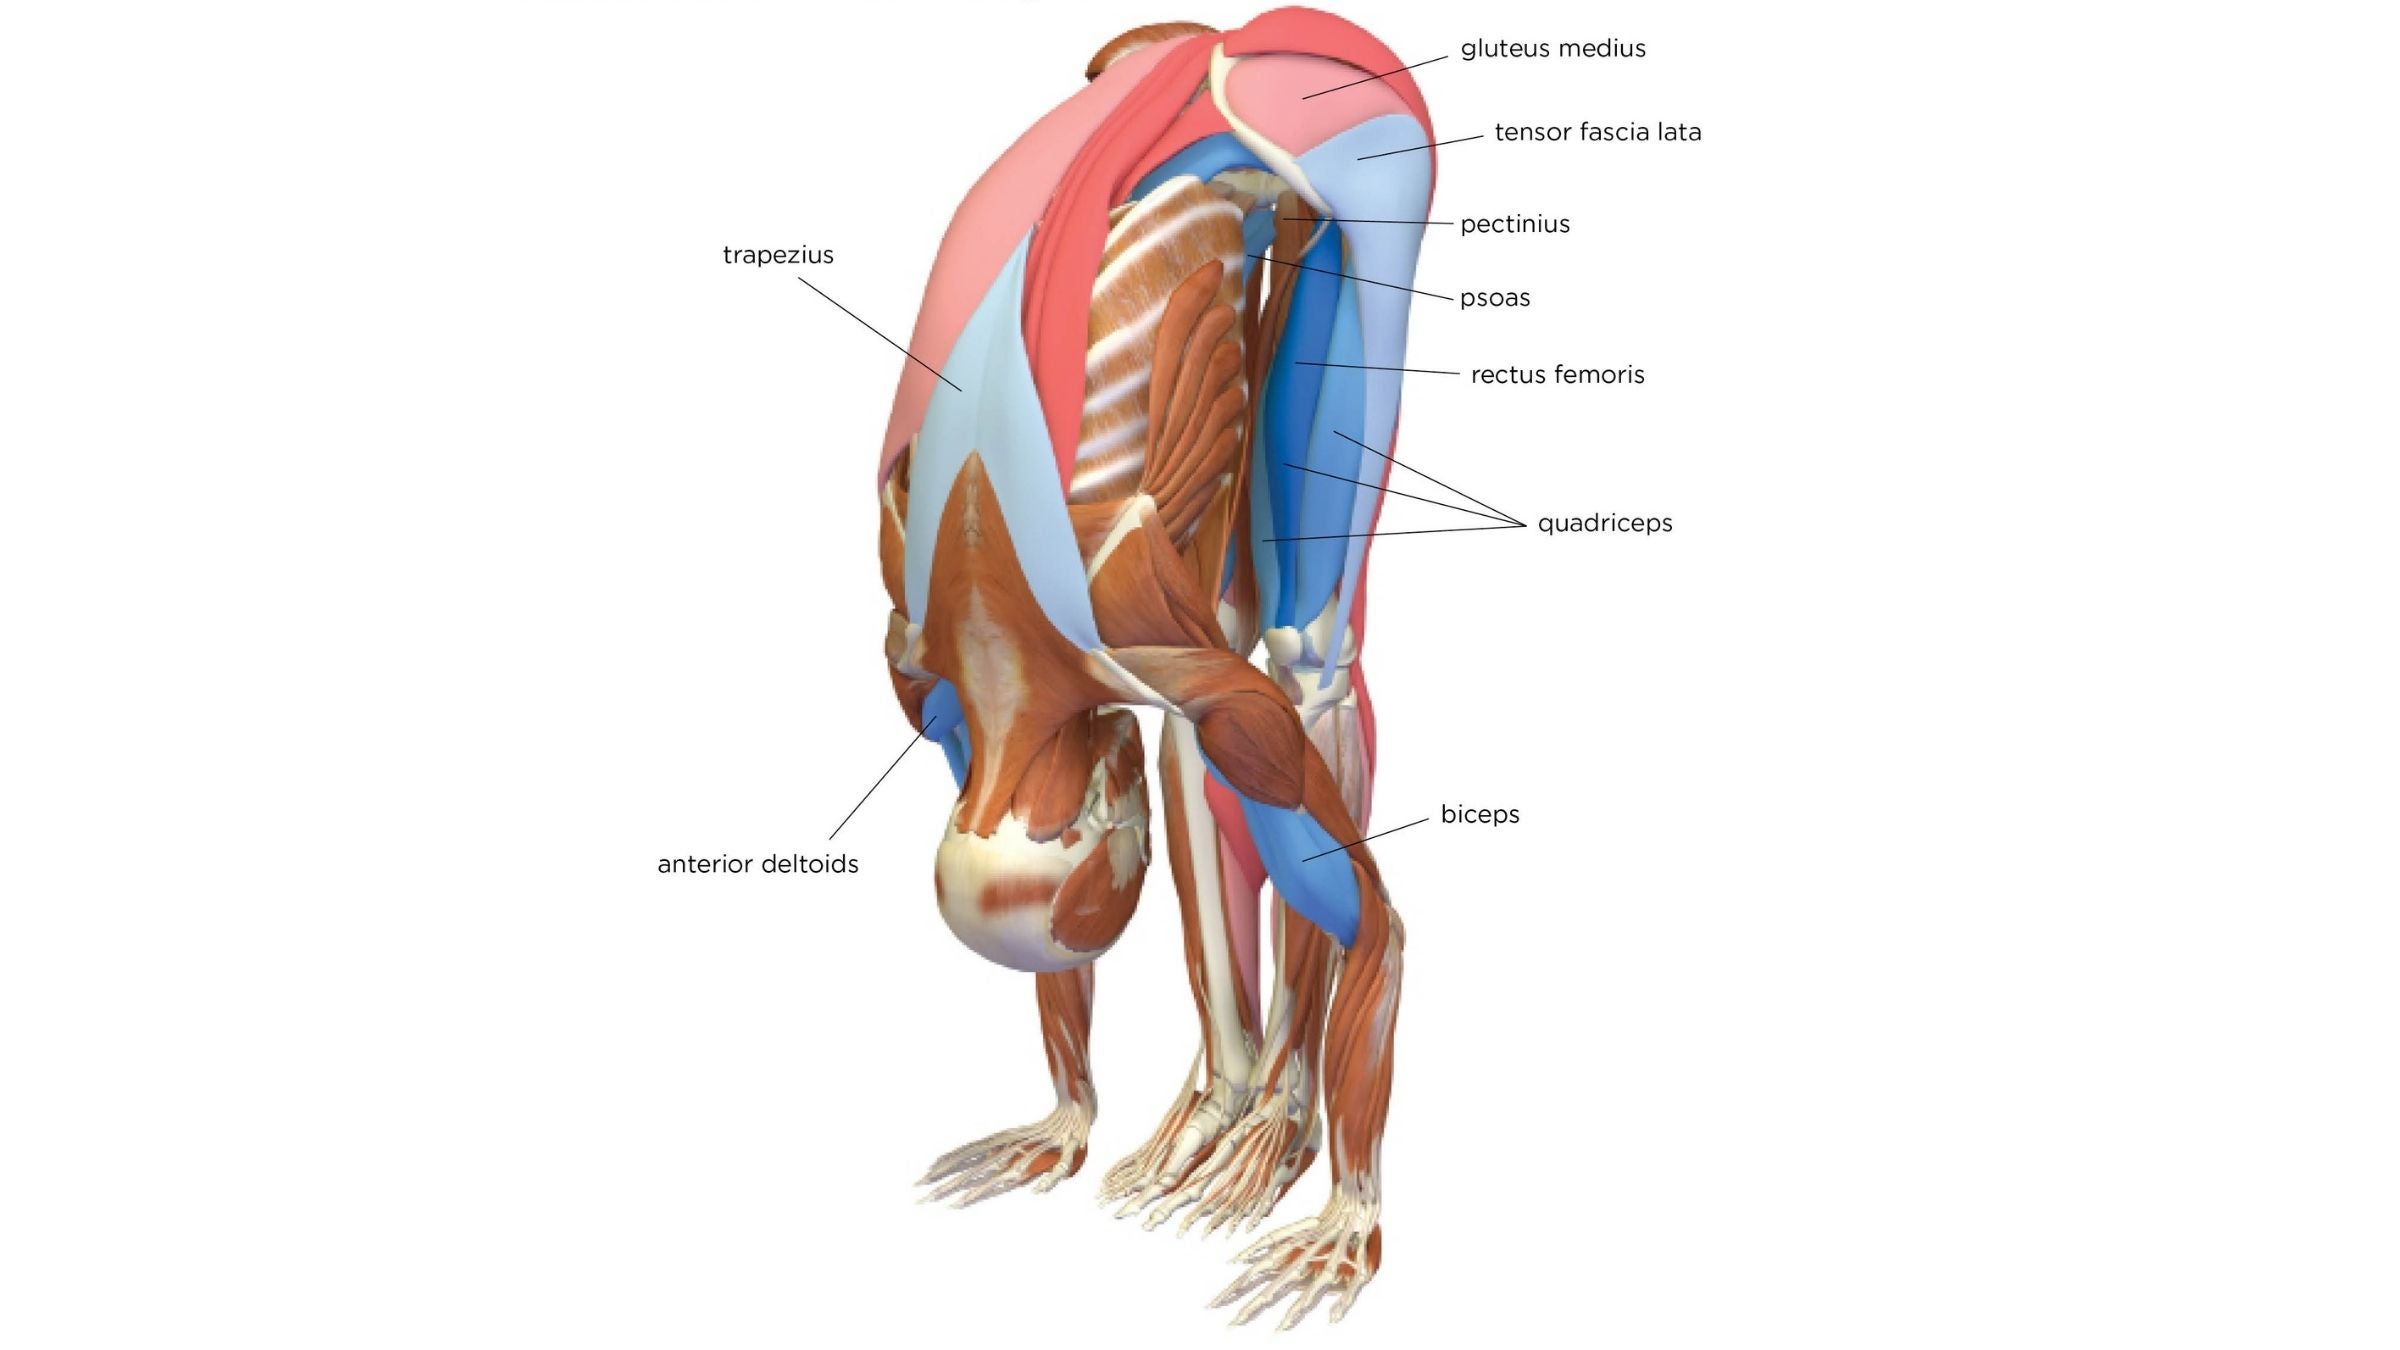
Train yourself to activate your quadriceps as you bend forward into Uttanasana. The gradual increase in force of this muscle contracting will straighten your knees and stretch your hamstrings.
Engage the hip flexors (the psoas and its synergists) as well as the abdominals to flex your hips and bend your trunk forward. Attempt to squeeze your torso against your thighs to contract the psoas. When you activate these muscles, it signals the gluteus maximums, erector spinae, and quadratus lumborum to relax into the stretch.
The contraction of the rectus femoris flexes the trunk and signals its antagonist muscles, the erector spinae and quadratus lumborum, to relax. When you engage this part of the quadriceps in forward-bending poses, you deepen the stretch of the antagonist back extensors.
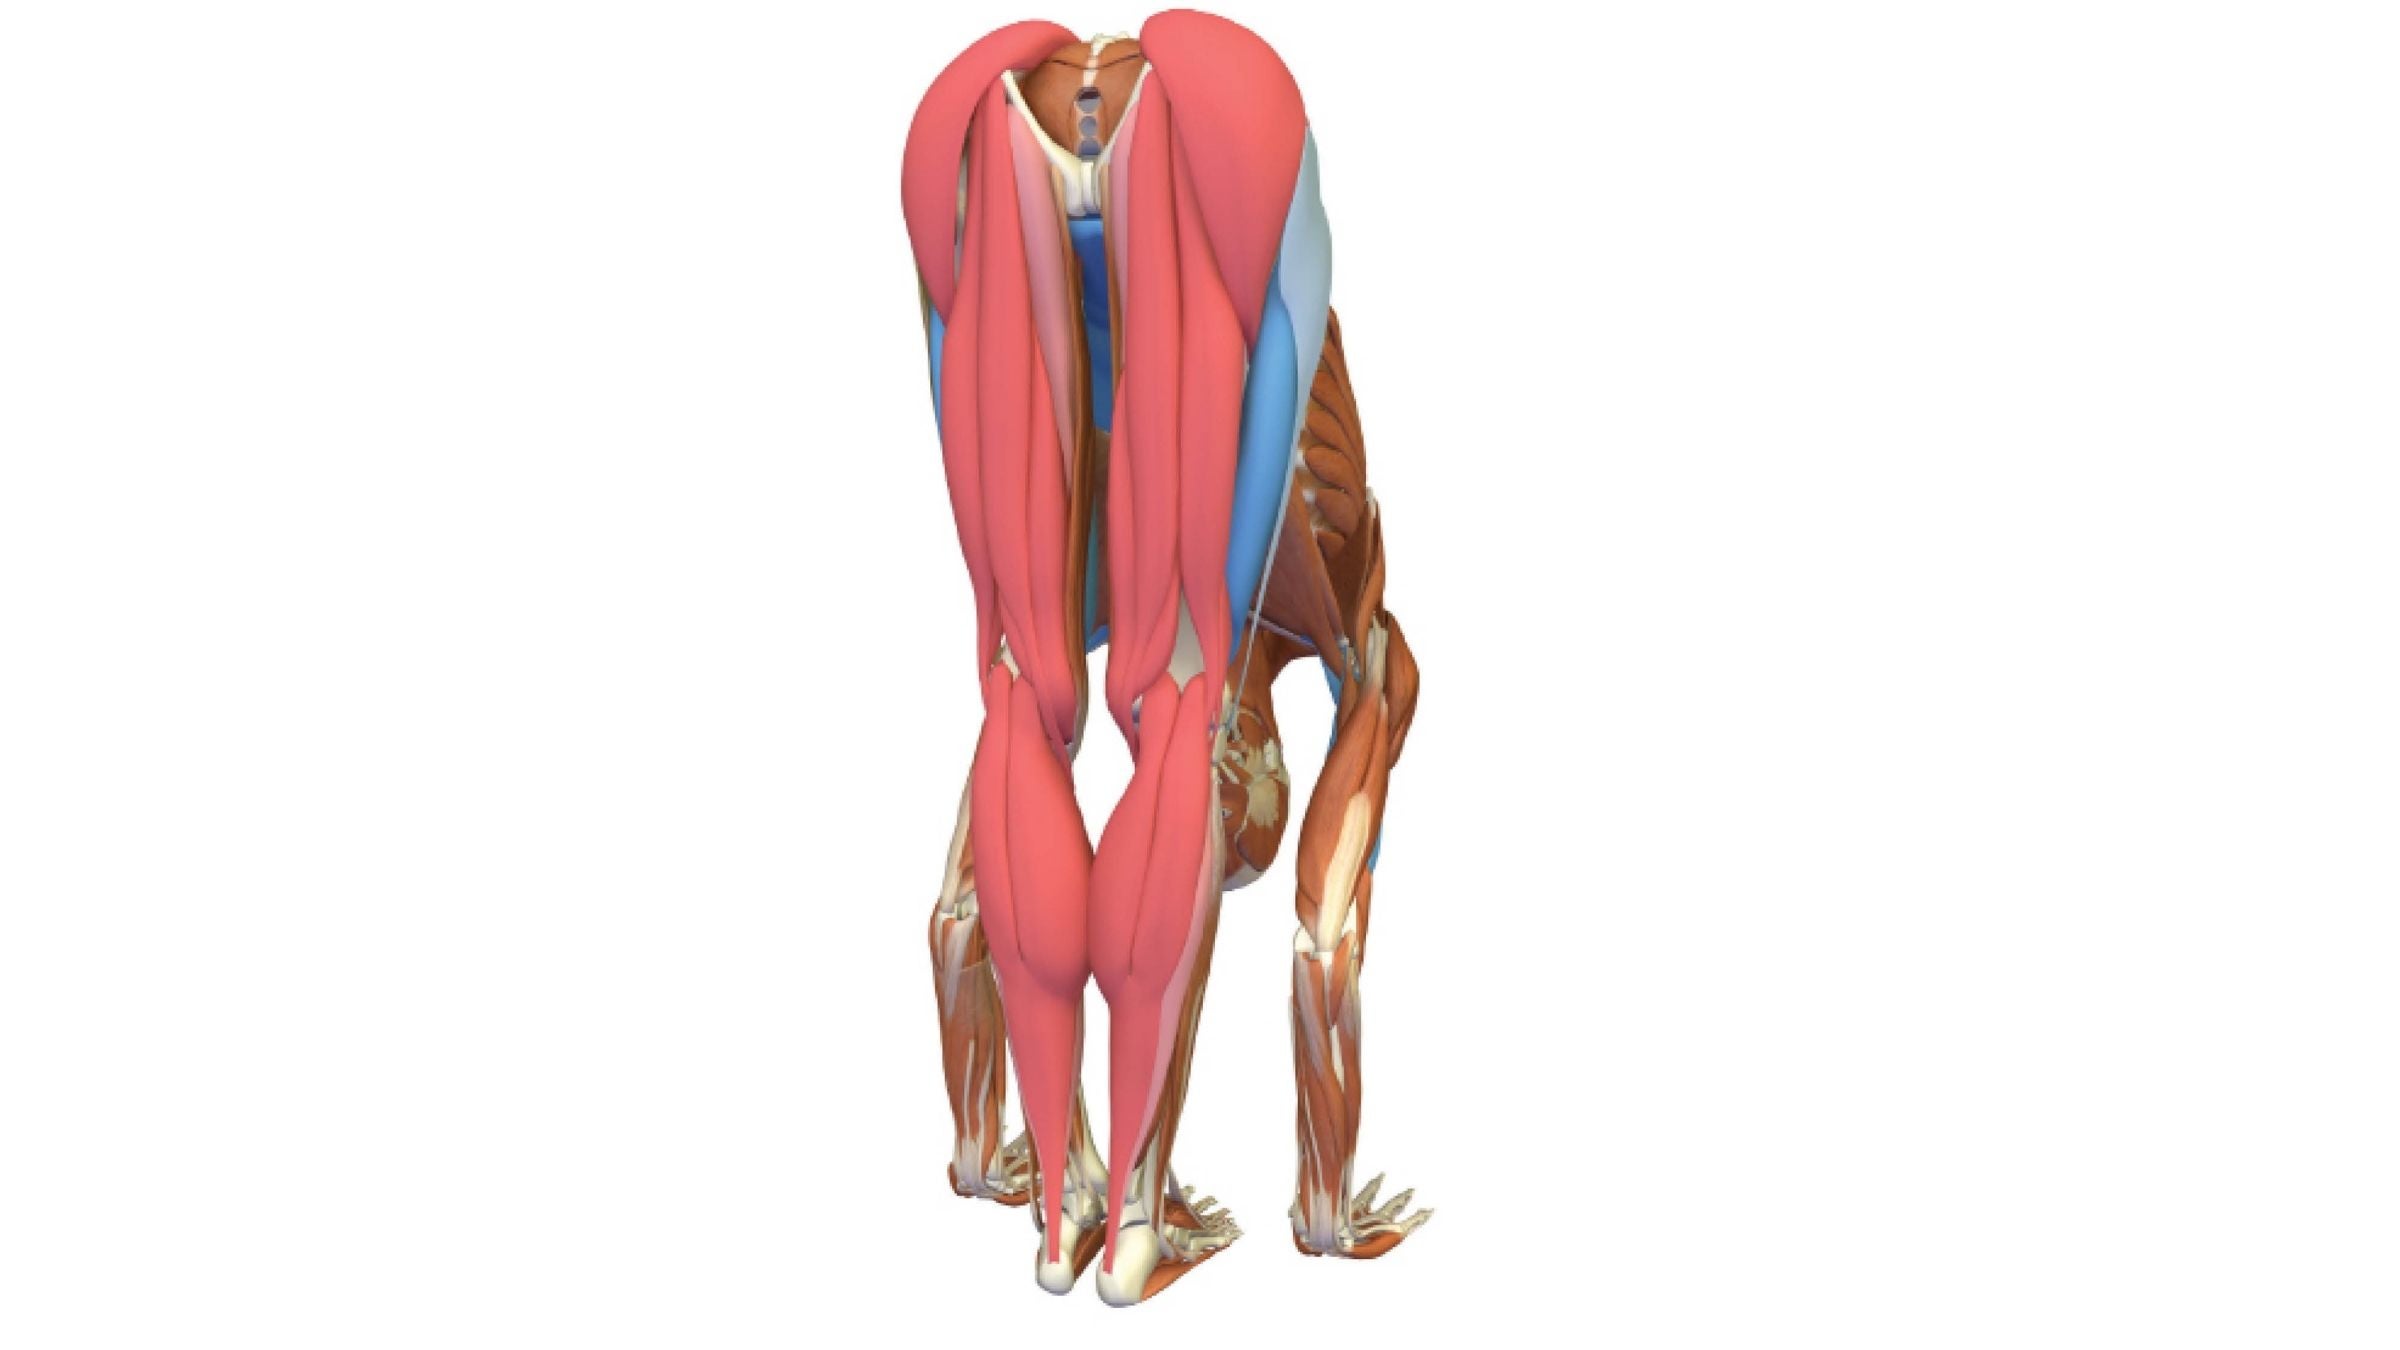
Press the balls of your feet into the mat and attempt to drag your feet apart, which will engage the tensor fascia lata and gluteus medius. This internally rotates your thighs to bring your kneecaps facing forward.
The pelvis tends to drift toward the back of the mat in this pose. Counter this by pressing your big toes into the mat. This engages the big toe flexors and works to bring the pelvis forward, aligning it over the ankles.
Excerpted with permission from The Key Poses of Yoga and Anatomy for Vinyasa Flow and Standing Poses by Ray Long.
Put Standing Forward Bend into practice
Here are a few flows to try that feature Standing Forward Bend:
Section dividerAbout our contributors
Teacher and model Natasha Rizopoulos is a senior teacher at Down Under Yoga in Boston, where she offers classes and leads 200- and 300-hour teacher trainings. A dedicated Ashtanga practitioner for many years, she became equally as captivated by the precision of the Iyengar system. These two traditions inform her teaching and her dynamic, anatomy-based vinyasa system Align Your Flow. For more information, visit natasharizopoulos.com.
Ray Long is an orthopedic surgeon and the founder of Bandha Yoga, a popular series of yoga anatomy books, and the Daily Bandha, which provides tips and techniques for teaching and practicing safe alignment. Ray graduated from the University of Michigan Medical School and pursued post-graduate training at Cornell University, McGill University, the University of Montreal, and the Florida Orthopedic Institute. He has studied hatha yoga for over 20 years, training extensively with B.K.S. Iyengar and other leading yoga masters, and teaches anatomy workshops at yoga studios around the country.