Interface with Cleware USB IO Module - SysMan AS
Interface with Cleware USB IO Module - SysMan AS
Interface with Cleware USB IO Module - SysMan AS

You also want an ePaper? Increase the reach of your titles
YUMPU automatically turns print PDFs into web optimized ePapers that Google loves.
TechNote<br />
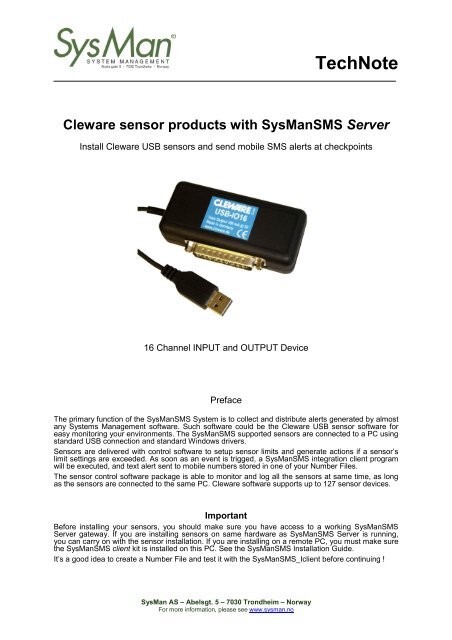
<strong>Cleware</strong> sensor products <strong>with</strong> <strong>SysMan</strong>SMS Server<br />
Install <strong>Cleware</strong> <strong>USB</strong> sensors and send mobile SMS alerts at checkpoints<br />
16 Channel INPUT and OUTPUT Device<br />
Preface<br />
The primary function of the <strong>SysMan</strong>SMS System is to collect and distribute alerts generated by almost<br />
any Systems Management software. Such software could be the <strong>Cleware</strong> <strong>USB</strong> sensor software for<br />
easy monitoring your environments. The <strong>SysMan</strong>SMS supported sensors are connected to a PC using<br />
standard <strong>USB</strong> connection and standard Windows drivers.<br />
Sensors are delivered <strong>with</strong> control software to setup sensor limits and generate actions if a sensor’s<br />
limit settings are exceeded. As soon as an event is trigged, a <strong>SysMan</strong>SMS integration client program<br />
will be executed, and text alert sent to mobile numbers stored in one of your Number Files.<br />
The sensor control software package is able to monitor and log all the sensors at same time, as long<br />
as the sensors are connected to the same PC. <strong>Cleware</strong> software supports up to 127 sensor devices.<br />
Important<br />
Before installing your sensors, you should make sure you have access to a working <strong>SysMan</strong>SMS<br />
Server gateway. If you are installing sensors on same hardware as <strong>SysMan</strong>SMS Server is running,<br />
you can carry on <strong>with</strong> the sensor installation. If you are installing on a remote PC, you must make sure<br />
the <strong>SysMan</strong>SMS client kit is installed on this PC. See the <strong>SysMan</strong>SMS Installation Guide.<br />
It’s a good idea to create a Number File and test it <strong>with</strong> the <strong>SysMan</strong>SMS_Iclient before continuing !<br />
<strong>SysMan</strong> <strong>AS</strong> – Abelsgt. 5 – 7030 Trondheim – Norway<br />
For more information, please see www.sysman.no
TechNote<br />
<strong>Cleware</strong> sensor and software installation<br />
1. The order of installing hardware or software is not important, but do not connect any channel<br />
input switch before the initial <strong>Cleware</strong> settings are done.<br />
2. Insert the <strong>SysMan</strong>SMS CD in the CDROM drive on the PC where sensor(s) will be connected.<br />
With your File browser go to Options -> <strong>Cleware</strong> folder and start SETUP<br />
3. Now continue installation up to the Finish point. If not done, now connect the <strong>USB</strong> cable.<br />
Control software<br />
From Start > Programs, start the <strong>Cleware</strong>Control program. You will immediately after the program<br />
start see the status of the sensor device. (If not seen, use Refresh menu) If you have multiple sensors,<br />
each will have its own color. Each sensor is manufactured <strong>with</strong> individual serial numbers.<br />
Integration <strong>with</strong> <strong>SysMan</strong>SMS Server gateway<br />
In the control software, settings for each sensor can be added or modified. For the <strong>IO</strong>16 device, each<br />
channel can be set to start a program if input channel changes. The software is fully compatible <strong>with</strong><br />
the <strong>SysMan</strong>SMS_Iclient and its associated Number Files. Do the following to setup Iclient integration:<br />
• From the <strong>Cleware</strong>Control program’s menu, select View > Device Settings<br />
• In the Device Setting screen you may rename the sensor for easier recognition<br />
• IMPORTANT: In the Contact configuration, set all 16 channels to INPUT mode<br />
• You can now safely connect your switch device(s) to the input plug of the <strong>IO</strong>16 device<br />
Any potential free switch can be connected between channel pin and a ground pin of the 25 pin D-Sub connector:<br />
<strong>SysMan</strong> delivers advanced sensors like “missing 220V”, to be connected to <strong>IO</strong>16 device. Contact <strong>SysMan</strong> for details.<br />
• Select your active channel and select ADD in the Switch point window<br />
• Decide if the action should be taken at Opened or Closed input; or both<br />
• Set Action type to Start program<br />
In the Action field, type the path to the <strong>SysMan</strong>SMS_Iclient program, the parameters you want to<br />
go <strong>with</strong> the alert and the name of a Iclient Number File (week_1). If Number File given, default is the<br />
<strong>SysMan</strong>SMS_Iclient.lst in Iclient folder. Please refer to the <strong>SysMan</strong>SMS Server User and Developers<br />
Guide for information on how to use the Iclient program and the Number File Editor. Example:<br />
C:\Program Files\<strong>SysMan</strong>SMS\Iclient\<strong>SysMan</strong>SMS_Iclient.exe<br />
"Sensor: %SN% is CLOSED" ":week_1"<br />
Note the apostrophes (“) around the Text and Number File parameters for the Iclient.<br />
Also note the colon (:) to indicate that this is the name of a local stored Number File. By use of a two<br />
colon indicator (::) you will be able to specify a Number File stored in the Servers Iclient folder.<br />
Now click the Test button to verify settings. If the settings are correct, you should receive an SMS<br />
<strong>SysMan</strong> <strong>AS</strong> – Abelsgt. 5 – 7030 Trondheim – Norway<br />
For more information, please see www.sysman.no
TechNote<br />
Sensor text variables:<br />
%SN% = Sensor Name<br />
%DT% = Date and Time<br />
%DA% = Date<br />
%TI% = Time<br />
Run <strong>Cleware</strong> software in background<br />
To have your <strong>Cleware</strong> sensors start at Windows startup, you will have to indicate this.<br />
• From the <strong>Cleware</strong>Control program’s menu, select View > Start Settings<br />
• In the Start Settings dialog, enable the Start <strong>Cleware</strong>Control Service<br />
IMPORTANT:<br />
If your <strong>SysMan</strong>SMS Iclient is a remote installation (not located on <strong>SysMan</strong>SMS Server) you must<br />
make sure that the account used by the <strong>Cleware</strong> Service has access to the <strong>SysMan</strong>SMS Server.<br />
Either use a domain account, or alternatively use an account <strong>with</strong> same Username/Password.<br />
<strong>SysMan</strong> <strong>AS</strong> – Abelsgt. 5 – 7030 Trondheim – Norway<br />
For more information, please see www.sysman.no
TechNote<br />
Save sensor data to history file<br />
To have your <strong>Cleware</strong> sensors store data for later review, do the following:<br />
• From the <strong>Cleware</strong>Control program’s menu, select View > System Settings<br />
• Enable the Save automatic every – and then enter a sample interval value<br />
Enter a Path and file name for your history file: C:\SensorData\MyFile-%###%.cwc<br />
Note: Use %DT% or %###% as part of file name to make it a unique name<br />
• Click the Use filename, no acknowledge; and then click Ok to finish definition.<br />
To view your historical data, go to the folder you selected and double-click on your file.<br />
<strong>Cleware</strong> Control will start a view of your saved data.<br />
<strong>SysMan</strong> <strong>AS</strong> – Abelsgt. 5 – 7030 Trondheim – Norway<br />
For more information, please see www.sysman.no
TechNote<br />
<strong>USB</strong>-<strong>IO</strong>16 Connection examples:<br />
Missing 220V<br />
sensor<br />
Smoke<br />
sensor<br />
Door Switch<br />
Note: All inputs to the <strong>USB</strong>-<strong>IO</strong>16 device is potential free open/closed switches<br />
<strong>SysMan</strong> <strong>AS</strong> – Abelsgt. 5 – 7030 Trondheim – Norway<br />
For more information, please see www.sysman.no