
 Given recent upgrades in my printing capabilties, I decided to treat myself to a new monitor as well. After some research, I selected a Dell U2413, a sub-$500, backlit IPS with wide-gamut coverage (99% Adobe RGB, 100% sRGB). With good reviews on TFT Central and elsewhere, it’s probably one of the best options for amateur photographers who can’t justify spending $2,200 on an Eizo ColorEdge .
While purportedly marketing their flagship monitor to prosumer photographers, Dell unfortunately didn’t see fit to manufacture a hood for it. I wanted a monitor hood to block the light coming in from my large windows (and more honestly, because pimping my monitor adds a little photog street cred).
Options on eBay were either expensive or cheaply made. So, I decided to go the DIY route and build my own inspired by Roger Sacul’s, post on DIY Photography. I took his concept a few steps closer to professional hoods I’ve seen. First, my design eliminates any gaps that would be noticeable if a light source were behind your monitor by extending the supports the width and length of the monitors’s top and sides. Secondly, I incorporate microsuede to eliminate any reflections off the smooth surface of the plastic. The end result looks a lot closer to the real deal (for a lot less money).
While his post contains a basic framework and some nicely taken photos of the end product, it’s a bit short on the details one would normally find on an Instructable. While I’m not as good a photographer, I do have some skill with Google SketchUp. So, hopefully, this post fills some of those gaps (pun intended).
First of those shortcomings was a inadequate Bill of Materials. Here you go;
Plastruct 90007 Angle ABS 5/16″ (Pack of 4) (They’re grey. Don’t worry. We’ll take care of that later)
ABS Sheet – .118″ Thick, Black, 12″ x 24″ (or 24″ x 24″ for full length sides)
12″ X 36″ Self-Adhesive MicroSuede
Testors Enamel 1/4 Oz Bottle Flat Black
1.75oz Testors Enamel Plastic Model Paint Thinner
Surehold Plastic Surgery Super Glue
Velcro strips (Pack of 4)
Heavy Duty Utility Knife or hacksaw
Medium Grit Sandpaper
Backing board (larger than 6″ x 12″)


The second shortcoming of Roger’s post was a lack of comprehensive measurements. Those that were present had some weird “cm” notation that my ruler didn’t have on it. Here in ‘Merica we use the Imperial units of measure just like the Queen intended!
You could use these instructions to construct a hood for another brand or size monitor. You can adjust the top and side dimensions accordingly. You’ll obviously need a larger ABS sheet for monitors wider than 24″.
Cutting
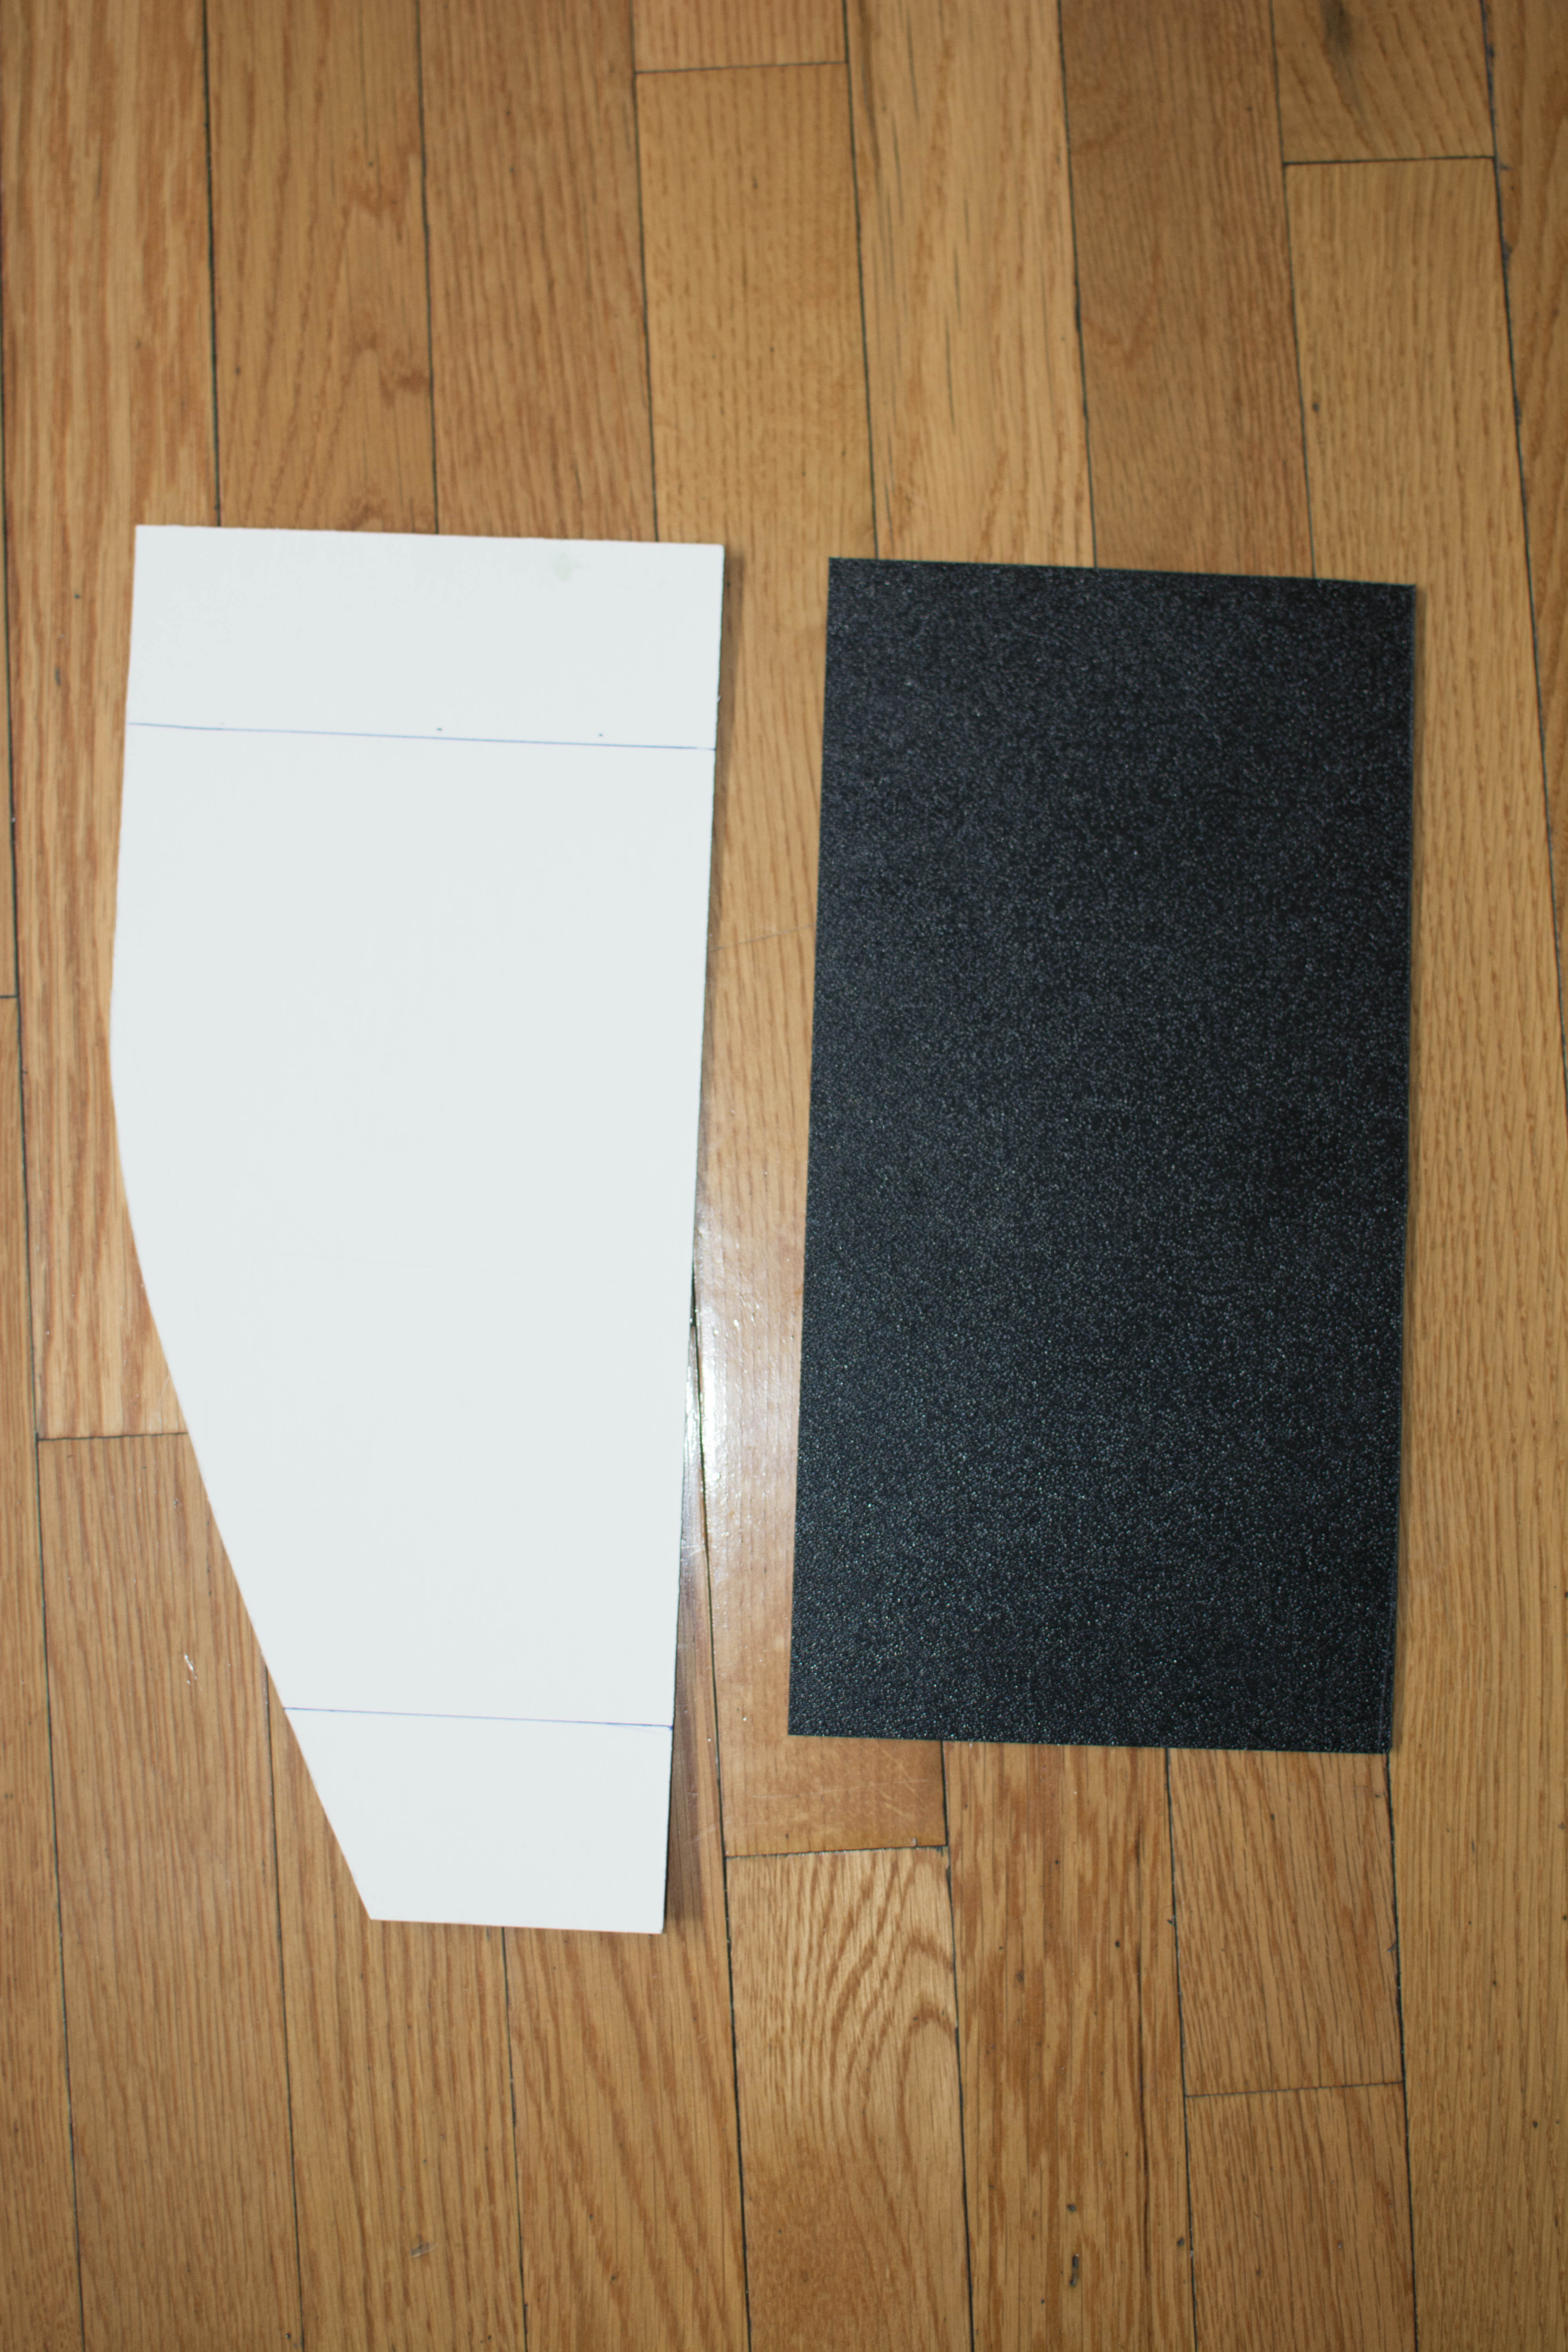
The ABS sheet has a textured and smooth end. All cuts should be made smooth side up. This will serve as the interior face of the hood. Don’t worry about stray marks since we’ll eventually cover things up with paint and the adhesive suede.
First, cut the ABS sheet down the middle lengthwise to form two 6″ x 24″ sections. If you have a hacksaw, you may be able to do this is one cut. I only had a utility blade. While this eats up less material in the cutting (i.e. the width of the blade equals the amount of material lost), it takes longer because you need to “score” the material. If you’re not familiar with scoring, that’s where you don’t cut the material in one operation but, instead do a progression of cuts, each deeper than the next, to eventually cut all the way through. One trick I found was that I only need to score about halfway through before I could fold the sheet and get a fairly clean cut.
Another tip to get a nice clean score; once I had my straightedge laid out and measured correctly, I used blue painter’s tape to “lock it down” on the non-cutting side. This keeps the straightedge from moving between scores (cuts). Resist the urge to try adding too much pressure on each cut. This first one is the longest and I honestly had to walk away from it because my hand went numb after a while. Taking a 30 minute break, some aspirin, and some beer helped me. I highly recommend it.
Now, you have two sections of 6″ x 24″. Take one and cut it in half as well. Same process as before. The resulting 6″ X 12″ sections will be the sides of the hood.
Now, here’s the only part that varies depending on your specific monitor; the length of the top section. The U2413 has curved corners so just running a tape measure along the top is a inaccurate. The better option is to run the tape measure across the face of the monitor and measure to the outtermost edges. Now here’s the most important part; be very exact and remember to add the width of the ABS angles. Here’s how it worked in my case; edge to edge the U2413 is 21 7/8″ wide (like I said, be exact to 16th’s of an inch). If you bought the same angle as in my bill of materials, the wall width of the angle is 1/16″. We will use two angles; one on each side.
21 7/8″ + 1/16″ + 1/16″ = 22″
If you have a U2413 like me, then just take the 6″ x 24″ section and cut the length to exactly 22 inches.

NOTE: At a 12″ length my sides are about 2 3/4″ short of the bottom of the monitor. If you’d like longer sides (as I would, were I to do it again) use a 24″ x 24″ ABS sheet. You’ll have to adjust your measurements slightly and make a few more cuts.
If you’re tired of cutting, you could just leave the sides squares and go straight to gluing. However, curved edges will make your end result look that much more professional. Here’s where I found Roger’s post the most lacking in detail. He just referenced an Eizo manual and a small diagram of the hood that comes with it. I found that difficult to adjust to the dimensions I needed. So, I created my own using OmniGraffle. You can download my PDF Template.
Print the template file on US Legal paper (8.5″ x 14″). Cut it out along the lines and you have your first template. Now, paper isn’t thick enough to use as a straightedge. So, take your paper template and transfer it onto the matboard. I taped the paper to the board on the three straight edges (line it up corner to corner). Use the utility knife to cut along the curve and bottom edge. TIP: Use a pen to write LEFT on one side of the matboard and RIGHT on the other. This will remind you to flip the matboard between cuts and keep you from ending up making duplicates of the same side. You don’t have a lot of margin for error with materials here, so measure twice and cut once always.

Repeat the same steps (tape included), this time with the matboard to transfer the shape to the two 6″ x 12″ pieces of ABS plastic. Use the same scoring techniques as before; smooth side facing up. Again be sure which side you’re cutting on, otherwise you could end up creating two of the same side.
Now you have to cut the L-shaped angle pieces that will serve as the connectors and frame for the top and sides. Again you can use a saw or knife. Same techniques apply. I found it was easy to use my blade to cut through one part of the angle and then just fold it to make a clean break, rather than cut through the entire thing. That will save some time.
If you bought the same item I have in my bill of materials, you have four sections 24″ long. You’ll need only three of these with some material left over.
Take one section and cut it into 4 equal lengths of 6″ each. These will be the top left and right inner and outer corners.
Take a second section, and cut it in half; two lengths of 11 1/2″ each. These will be the left and right vertical edges.
Take the third section and cut it to 21 3/8″. This will be your top horizontal section. It will go between the two vertical sections so, we subtract their width from our top measurement (22″ – 1/16″ – 1/16″) .
Assembly
Finally, all the cutting is done. Now comes the assembly. A word of advice, try fitting pieces together before gluing. Once you lay down glue, you’re committed. Sanding the areas to be glued helps gives the glue a better surface to adhere to. You may also need to sand edges just to make sure things marry up correctly.
Also, I highly recommend the Plastic Surgery glue. It’s like Krazy Glue only better suited for plastics. I started off using PermaPoxy PlasticWeld and it was terrible for such detailed work. Epoxy expands on drying; creating gaps and leaving residue all over the place. After switching, I was much happier with the results.
Take the 22″ x 6″ panel of black ABS that will serve as the top of the hood and place it textured side down. Use the sand paper to scuff up the smooth surface on the left and right face. This will help the glue adhere better. Take two of your 6″ lengths of the gray angles and sand the outer sides as well.
Glue the angles flush to the left and right sides of the sheet, angle facing inwards. I used a wood block to make sure the angle was flush to the side. Don’t leave it there too long or it might get glued as well!
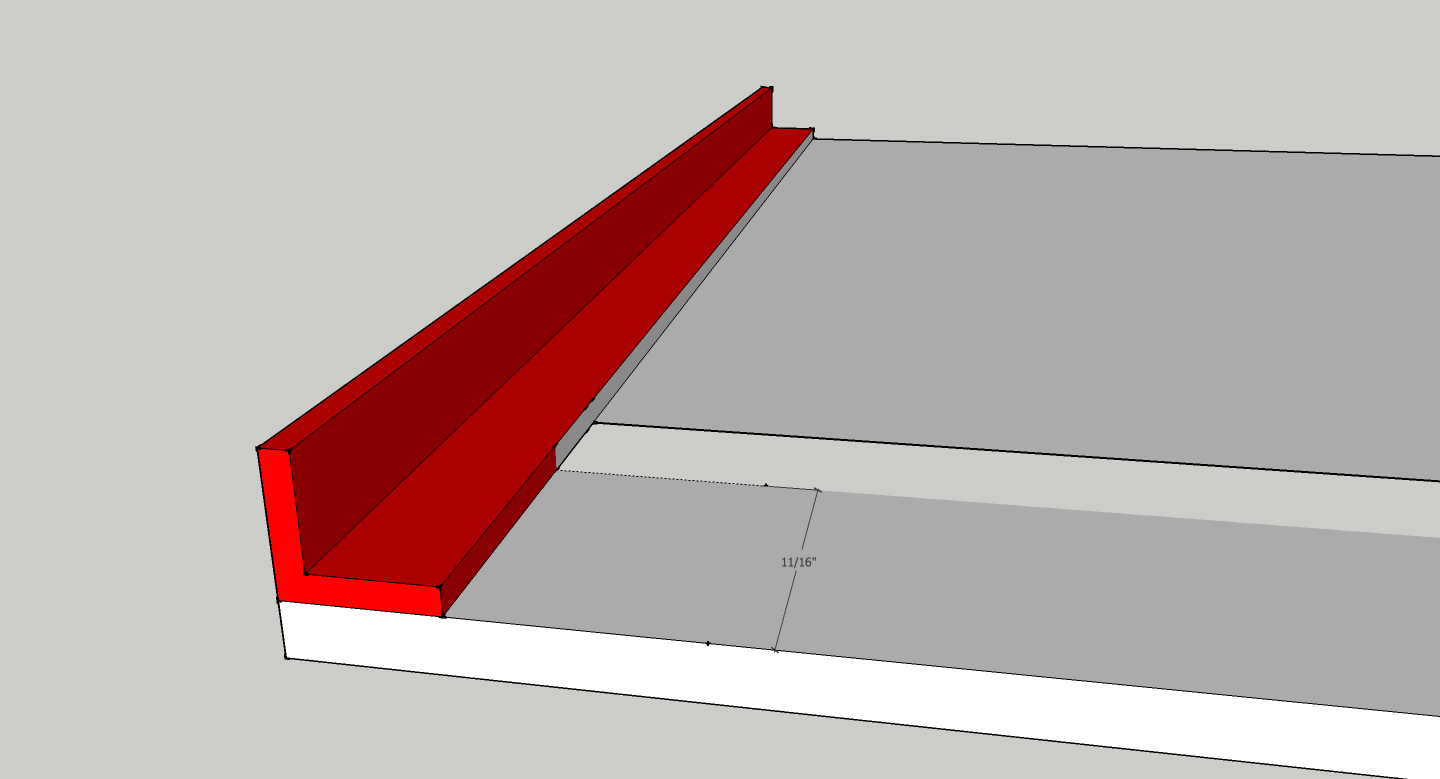
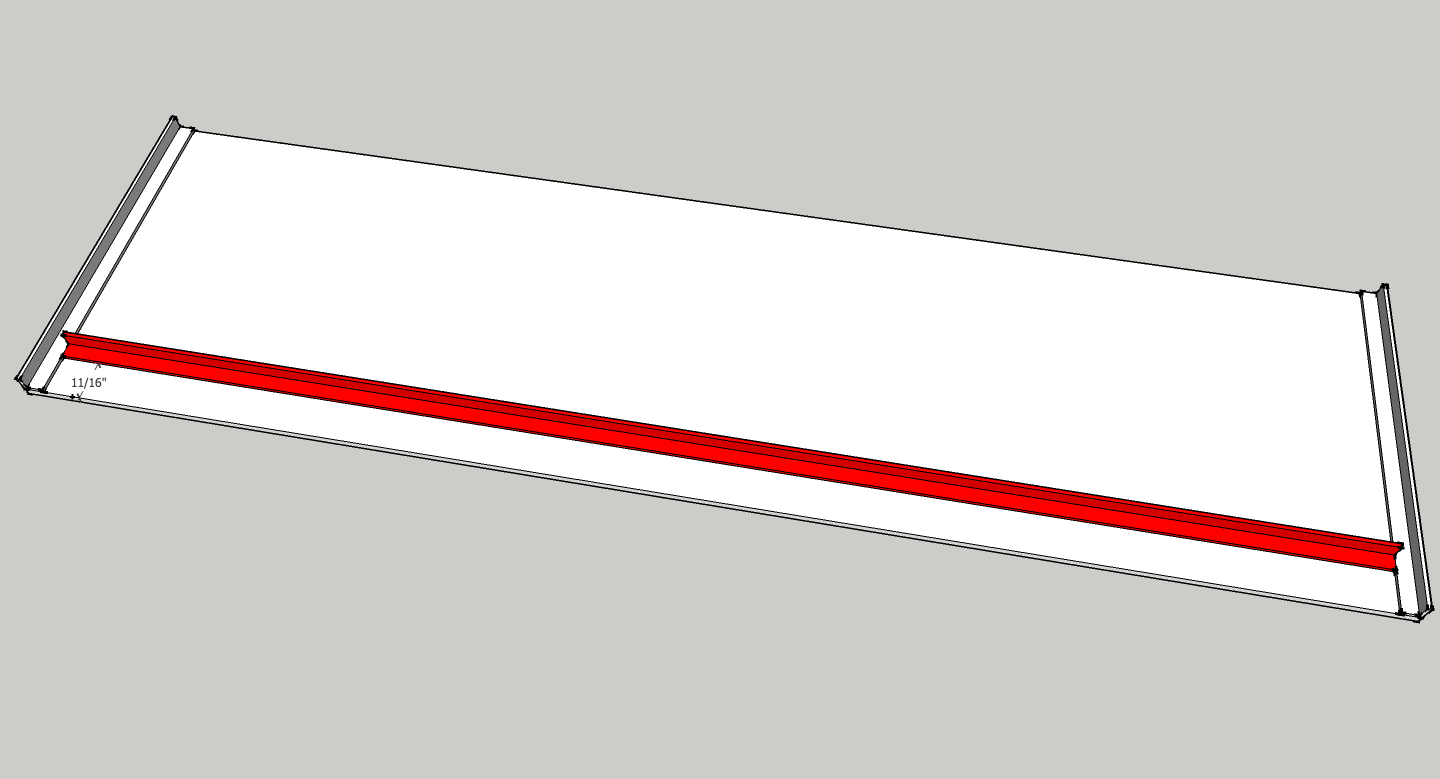
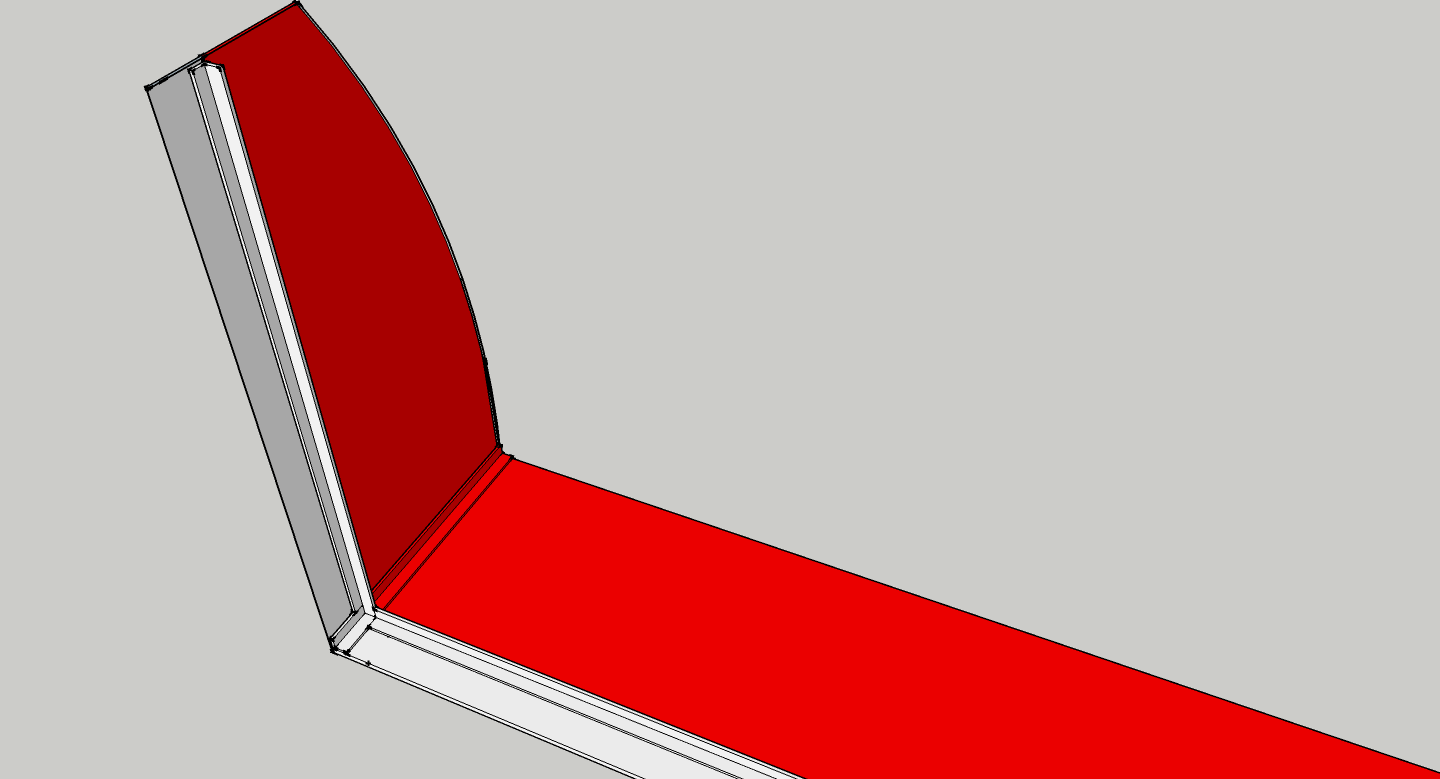
Next, take the longest 21 3/8″ gray angle section, sand and glue it parallel to the long edge of the black sheet, 11/16″ from that edge. Make sure the inside of the angle is facing the same edge as in the image below.
Wait about 30 minutes to let the glue dry sufficiently. Now, you can move on to gluing on the sides. Sand the smooth face on the top edge of the side panel and glue it to the side angle on the top section. Repeat on the other side.

I used a stack of books to hold the side panels vertical while the glue dried. I was concerned about the possibility of dripping glue adhering the whole thing to my desk, so I shifted the whole piece slightly every few second for the first 30 seconds. Give the glue another 30 minutes to dry after that.
Take the two remaining 6″ lengths of gray angle and glue them to the outside corners of the top and sides. This will cover up any imperfections in the cuts and make the whole thing more stable.

Next part is a bit tricky. Remember you have an extra angle piece if you F* it up.
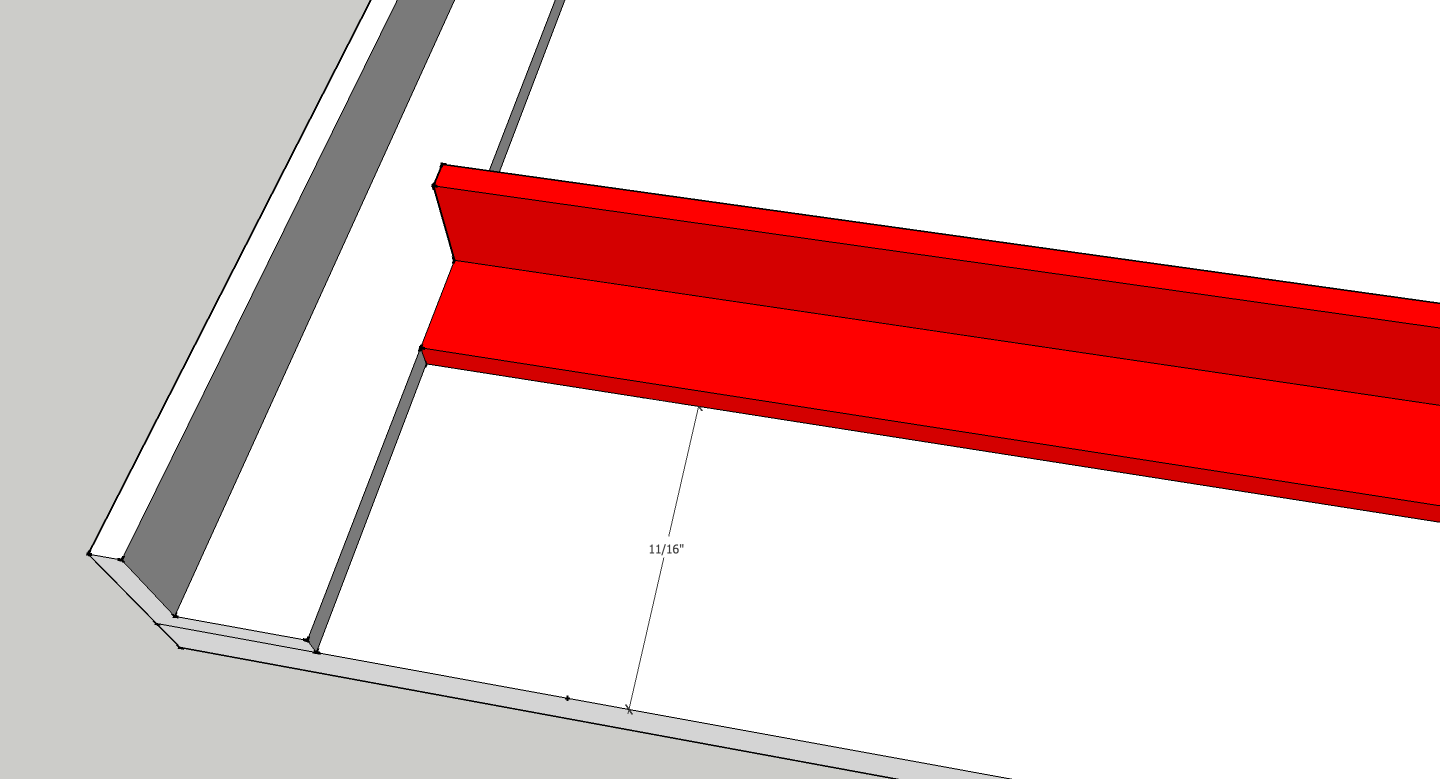
You have two remaining angles 11 1/2″ long. We’ll glue those to the sides, perpendicular to the cross angle. Cut a notch in the top of the angle to make it fit flush and covers any gaps. Again the angle is 11/16″ from the edge.


It’s easier to confuse sides here, so take your time and do one side at a time. Sand and glue the angles with the inside corner facing the back.
Finishing Touches
Sand down any sharp edges or overlapping sections where things aren’t flush. You may have some white on the edges of the black plastic sheet from where you folded it. Sanding it will get it back to black. We’ll also use the paint at the end for touchups.
Cut out a section of the microsuede 23″ x 5 7/16″. This is one inch longer than the top piece so, you have overlap with the suede on the side walls. I scored the backing in the middle so i could do one half at a time. Line up the suede flush to the front edge and fold the back edge over the cross angle. Binder clips or clamps can help here.

Use the matboard form you used to make the curved sides to cut out two pieces of the microsuede. Make sure to make all your cuts are adhesive side up and make sure to flip the form over from LEFT to RIGHT. Otherwise, you’ll end up getting making duplicates of one side rather than two sides (as I did).
The adhesive is quite strong so take your time to line things up. The suede should be flush to the front curved edge (not the back). Remove the backing and starting from the front curved edge, lay down the microsuede. When you get to the L- shaped side angles fold the microsuede over them. You may need the utility knife to make some cuts on the top and bottom. I used binder clips to ensure a solid adhesion on the angles. Trim the material between the back edge and the angle since that’s where we’ll place the velcro strips.
You can cut extra pieces to cover any gaps, but if you did this correctly the only exposed plastic on the interior will be covered by the monitor itself. If the edges have frayed threads coming out, light a match and run the flame quickly down the edge. This will melt the synthetic threads and keep them from unraveling.
Paint all outer gray angles and cover any other imperfections with the matte black paint.
Lastly, use the Command strips or adhesive Velcro to attach the hood to the monitor. I placed a one velcro strip on each side and two on top. You’ll need to trim the pieces to fit.
One day when I get a hacksaw, maybe I’ll cut a section out of the top center so I cant use my display calibration with the hood on. (See step 7 in Roger’s post.) My hand was too cramped after all that cutting to bother.
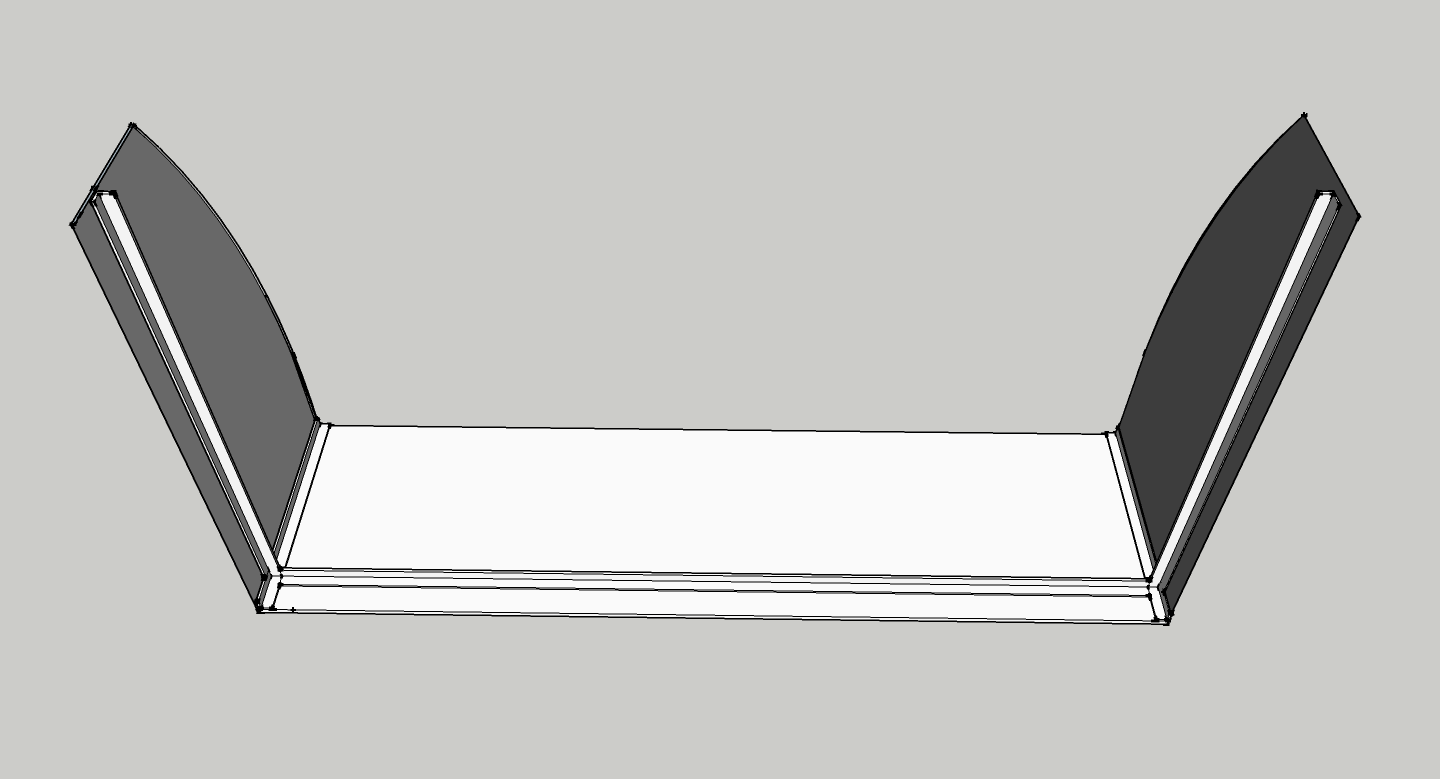
Final Product
Here’s a few attempts at documenting the final product as beautifully as Roger did.


This is awesome, thanks for sharing!!
LikeLike
Following along with this now, but I think there’s a slight typo in this paragraph:
“Take the third section and cut it to 21 3/8″. This will be your top horizontal section. It will go between the two vertical sections so, we subtract their width from our top measurement (22″ – 1/16″ – 1/16″).”
The final calculation should read (22″ – 5/16″ – 5/16″) as we are subtracting the full width of each plastic angle, not the thickness of each plastic angle.
Cheers!
LikeLike